How to Brace Your Core Properly for Squats and Deadlifts
Quick Answer Proper core bracing for squats and deadlifts means creating 360-degree intra-abdominal pressure by taking a deep diaphragmatic (belly) breath, then tightening the entire abdominal wall, obliques, and lower back as if preparing to be punched—while keeping the ribcage stacked over the pelvis. This turns the torso into a rigid cylinder that protects the spine and improves force transfer. Do not suck the stomach in. Hold the brace through the hardest part of the lift and reset between reps when needed. Mastering this skill is one of the highest-leverage ways to lift heavier weights more safely and consistently.
Why Bracing Matters More Than Isolated “Core Strength”
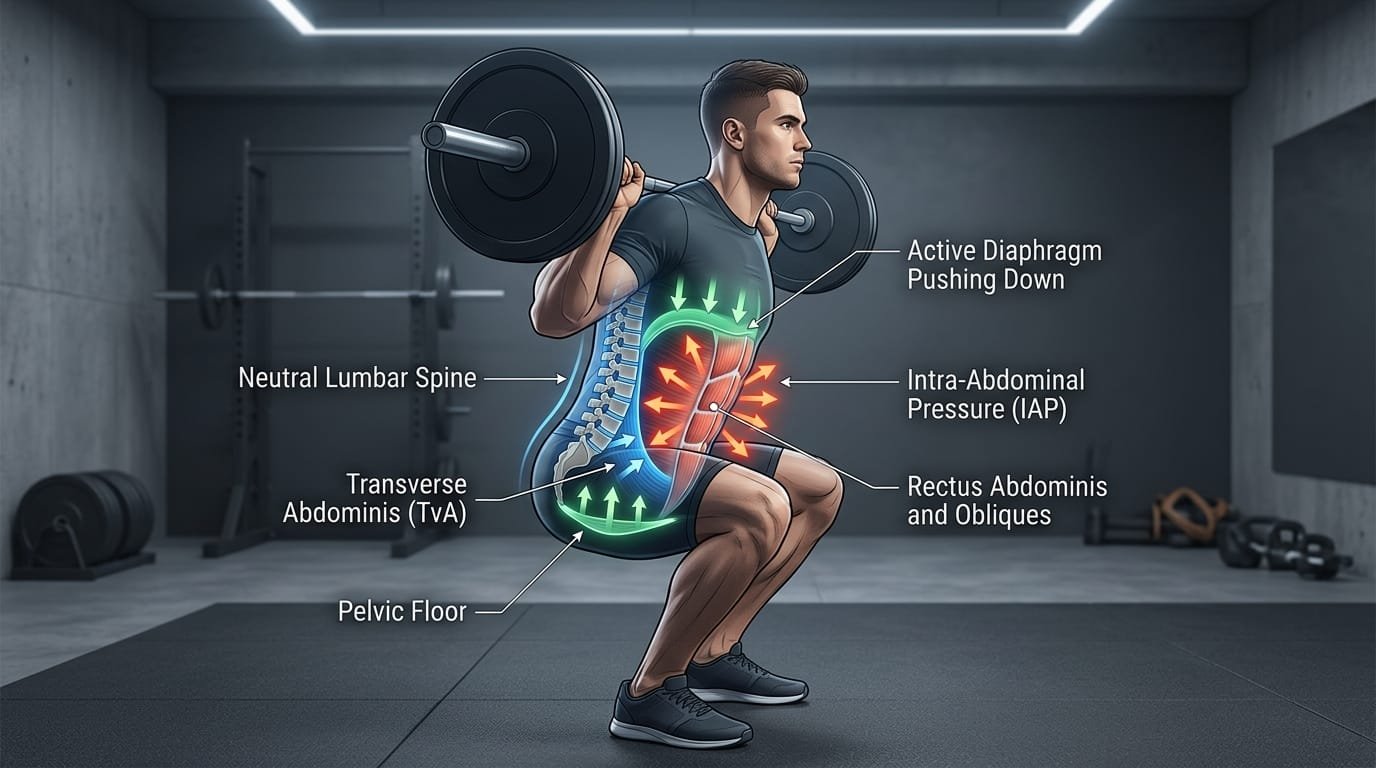
You can hold a long plank or perform hundreds of sit-ups and still collapse under a heavy squat or deadlift if you cannot generate and maintain high intra-abdominal pressure (IAP) under load. Bracing is a specific skill: creating circumferential stiffness around the spine so the torso resists flexion, extension, and rotation while the hips and legs produce force.
Spinal biomechanics research, including work associated with Dr. Stuart McGill, demonstrates that a full abdominal brace (co-contraction of the abdominal wall, internal and external obliques, and spinal erectors) produces greater lumbar stability than the “hollowing” or “draw-in” technique that primarily targets the transverse abdominis. When IAP is elevated, the spine is supported internally like a pressurized canister. This reduces shear and compressive stress on the intervertebral discs and allows more efficient force transfer from the ground through the barbell. Practical explanations of these principles appear in resources such as detailed bracing guides from SET FOR SET and lifting-focused breakdowns on LiftStrong.
Without adequate bracing, the spine becomes the weak link. The lower back rounds or hyperextends, the torso pitches forward, and performance and safety both suffer.
The Mechanics of a Proper Brace
A correct brace combines three elements at the same time:
- Diaphragmatic breath – Air expands the abdomen in all directions (front, sides, and back), not merely the chest.
- Muscular co-contraction – The rectus abdominis, internal and external obliques, transverse abdominis, and erector spinae all tighten outward against the expanding air.
- Ribcage-pelvis alignment – The ribs remain stacked over the pelvis (neither flared upward nor excessively tucked) so the diaphragm and pelvic floor can function as opposing ends of a closed pressure system.
The result is a stiff, pressurized cylinder. Effective cues include “breathe into your belly and sides,” “brace as if someone is about to punch you in the stomach from every angle,” and “push outward 360 degrees against your belt or an imaginary belt.”
Step-by-Step Bracing Sequence (Use Before Every Heavy Rep)
1. Establish neutral spine and stack the ribcage Stand tall or settle into your start position. Gently exhale to settle the ribs downward so they sit more neutrally over the pelvis. Avoid both excessive lumbar arching and complete flattening of the lower back.
2. Take a full diaphragmatic breath Inhale through the nose or mouth, directing the air into the belly and sides. You should feel expansion all the way around the torso. Placing the hands on the obliques provides useful tactile feedback.
3. Create the muscular brace While holding the air, tighten the entire midsection outward. Imagine pushing against a belt or preparing for impact from the front, sides, and back simultaneously. Do not suck the stomach inward—this reduces rather than increases pressure.
4. Add complementary tension Lightly engage the lats (cue: “armpits tight” or “bend the bar”) and squeeze the glutes. This completes full-torso and pelvic stiffness.
5. Move while maintaining the brace Perform the squat or deadlift while keeping the pressurized cylinder intact. Exhale only after passing the most difficult portion of the lift (or at lockout/top), then reset the breath and brace for the next repetition.
Bracing Specifics: Squat vs. Deadlift
Squat Bracing
- Take the breath and set the brace at the top, before beginning the descent.
- Because the bar rests on the back, you can usually expand the abdomen more freely.
- Maintain the brace through the bottom position and the drive upward.
- On moderate-to-higher repetition sets, reset the breath at the top between reps.
Deadlift Bracing
- Set the brace before or as you grip the bar and pull the slack out.
- The start position is more constrained, so think “tight cylinder” rather than maximum belly expansion.
- Hold the brace through the entire pull to lockout.
- Lower under control, reset the breath and brace, then initiate the next repetition.
In both lifts the objective remains identical: a rigid torso that does not collapse, round, or hyperextend under load.
Common Bracing Mistakes and How to Correct Them
| Mistake | Why It Undermines Performance & Safety | Correction |
|---|---|---|
| Sucking the stomach in | Reduces intra-abdominal pressure | Push outward 360° instead of drawing in |
| Breathing only into the chest | Fails to engage the diaphragm properly | Direct the breath into the belly and sides |
| Tensing only the front abs | Leaves the sides and back relatively soft | Create full circumferential tension |
| Losing the brace at the bottom | Spine becomes vulnerable at peak loading | Practice holding the brace through the full range of motion |
| Over-relying on a lifting belt | Belt amplifies pressure but cannot replace skill | Learn to brace hard without a belt first |
| Exhaling too early | Pressure drops exactly when it is needed most | Hold through the sticking point |
| Starting with an already extended or flexed spine | Reduces the effectiveness of the brace | Stack ribs over pelvis before taking the breath |
Practical Drills to Build Bracing Skill
- Supine 90/90 breathing and bracing – Lie on your back with feet elevated on a bench. Practice expanding into hands placed on the sides of the abdomen, then add the muscular brace.
- Standing brace holds with feedback – Take the breath, brace hard, and have a partner provide light external pressure from different directions.
- Plank with intentional 360° bracing – Instead of passively holding a plank, actively expand and push outward against the floor and imaginary resistance.
- Light paused squats or rack pulls – Use moderate loads and pause in the most demanding position to verify that the brace is still solid.
- Belt as feedback tool – Once the basic pattern is learned, a lifting belt gives you something tangible to push against, further elevating IAP.
Dedicate a few minutes at the start of lower-body sessions to these drills until the sequence becomes automatic.
Programming Recommendations for Stronger, More Consistent Bracing
- Treat every working set of squats and deadlifts as bracing practice, not merely leg or posterior-chain training.
- On heavier sets (approximately 80 % and above), use a full Valsalva-style brace and reset between repetitions.
- On lighter or higher-repetition sets, a slightly softer brace with more frequent breathing is acceptable, but never allow the torso to go completely soft.
- Pair heavy lower-body days with dedicated anti-extension and anti-rotation core work (dead bugs, bird-dogs, side planks, Pallof presses).
- Regularly film sets from the side to confirm that the torso remains rigid rather than collapsing or changing shape at the bottom.
Integrating Proper Bracing with the Rest of Your Training
Effective bracing improves force transfer and spinal safety in every loaded movement. It enhances presses performed with adjustable dumbbells and supports the powerful hip-hinge pattern used in kettlebell swings and deadlift variations. Strong grip endurance helps maintain upper-back tension that contributes to overall torso stiffness. Core stability work with an ab roller or anti-extension drills reinforces the same 360-degree tension required under the barbell.
Recovery tools such as a budget massage gun can help manage residual tension in the abdominal wall, obliques, or lower back after heavy sessions. Light cardio on a manual treadmill or mobility flows with resistance bands aid recovery. Continue applying sound shoulder and scapular mechanics from your lateral raise guidance so the upper body remains stable and does not undermine the brace.
Frequently Asked Questions
Is the Valsalva maneuver safe? For healthy individuals performing heavy strength training, the short-duration increase in intra-abdominal and blood pressure is the standard method used by powerlifters and weightlifters and is generally well tolerated. People with uncontrolled hypertension or certain medical conditions should consult a physician before using prolonged breath-holding under maximal loads.
Should I always wear a lifting belt? A belt can increase IAP by giving you a firm surface to push against, but it is not a substitute for the skill of bracing. Master the pattern without a belt first, then use the belt as an amplifier on heavier sets.
How do I know if I am bracing hard enough? You should feel solid pressure in the front, sides, and lower back. If a training partner can easily push your midsection inward, the brace is too soft. Under load, the torso should not visibly collapse, round, or hyperextend.
Can I breathe during the lift? On maximal or near-maximal singles, most experienced lifters hold the breath through the entire repetition. On moderate sets you can reset at the top of each squat or after lockout on deadlifts. Never exhale fully during the hardest portion of the movement.
Why does my lower back still round or hyperextend even when I try to brace? Common causes include insufficient IAP, starting with an already flexed or over-extended spine, limited hip mobility that forces spinal compensation, or simply a load that exceeds current capacity. Reduce the weight, improve the set-up position, and reinforce the brace with lighter, deliberate practice sets.
How long does it take to make bracing automatic? Most lifters notice clear improvement within 2–4 weeks of focused practice. Full automaticity under heavy loads typically develops over several months of consistent attention.
Final Recommendation
Proper core bracing is a trainable skill that dramatically improves both performance and safety in the squat and deadlift. Create 360-degree intra-abdominal pressure by breathing diaphragmatically into the belly and sides, then tightening the entire midsection outward while keeping the ribcage stacked over the pelvis. Maintain that rigid cylinder through the most demanding part of each repetition.
Practice the sequence deliberately with lighter loads until it becomes automatic. Combine it with targeted anti-extension and anti-rotation work, and use a lifting belt only as an enhancement once the underlying pattern is solid. When your brace is strong and consistent, heavier weights feel more stable, spinal stress is reduced, and force transfer from the legs and hips improves markedly.
Master the brace, film your lifts regularly, and treat every set as an opportunity to reinforce the skill. A strong, pressurized core is one of the highest-leverage upgrades any serious lifter can make—protecting the spine while unlocking greater strength.