How to Progress Push-Ups Without Aggravating Wrists or Shoulders
Quick Answer
Progress push-ups without aggravating wrists or shoulders by first locking in pain-free technique (elbows at 30–45 degrees, rigid plank, controlled scapular movement, neutral or supported wrists), then advancing through regressions and incremental overload rather than jumping straight to full or high-volume versions. Use elevated, knee, or neutral-wrist variations as long as needed, increase difficulty via range of motion, tempo, pauses, or leverage before adding repetitions or external load, and support the movement with scapular and rotator-cuff work. This approach builds strength and capacity while keeping joints comfortable.
Why Push-Up Progression So Often Irritates Wrists and Shoulders
Push-ups place sustained load through the wrists in extension and require precise timing between the scapulae, rotator cuff, and core. When volume, range, or leverage increases faster than tissue tolerance and motor control, the wrists and shoulders absorb stress that should be handled by muscle. Common results include wrist ache from hyperextension and shoulder irritation from flared elbows, poor scapular control, or loss of core rigidity.
Sustainable progression respects current capacity and improves it systematically instead of forcing the next harder variation.
Foundational Technique That Protects the Joints
Before any progression, these elements must be consistent:
- Hands placed roughly shoulder-width or slightly wider, stacked under the shoulders
- Elbows tracking at approximately 30–45 degrees from the torso (arrow shape, not T shape)
- Body in a rigid plank—glutes and abs braced, no sagging hips or piking
- Scapulae moving with control: protraction at the top, controlled movement on the way down
- Wrists either mobile enough for flat-palm work or kept neutral with handles, parallettes, knuckles, or elevation
Detailed cues for shoulder-friendly pressing and raising mechanics appear in Bent Arms vs. Straight Arms in Lateral Raises, The Hidden Mistake in Lateral Raises, and 3 Lateral Raise Modifications.
Neutral-Wrist and Joint-Friendly Setup Options
If flat-palm push-ups irritate the wrists:
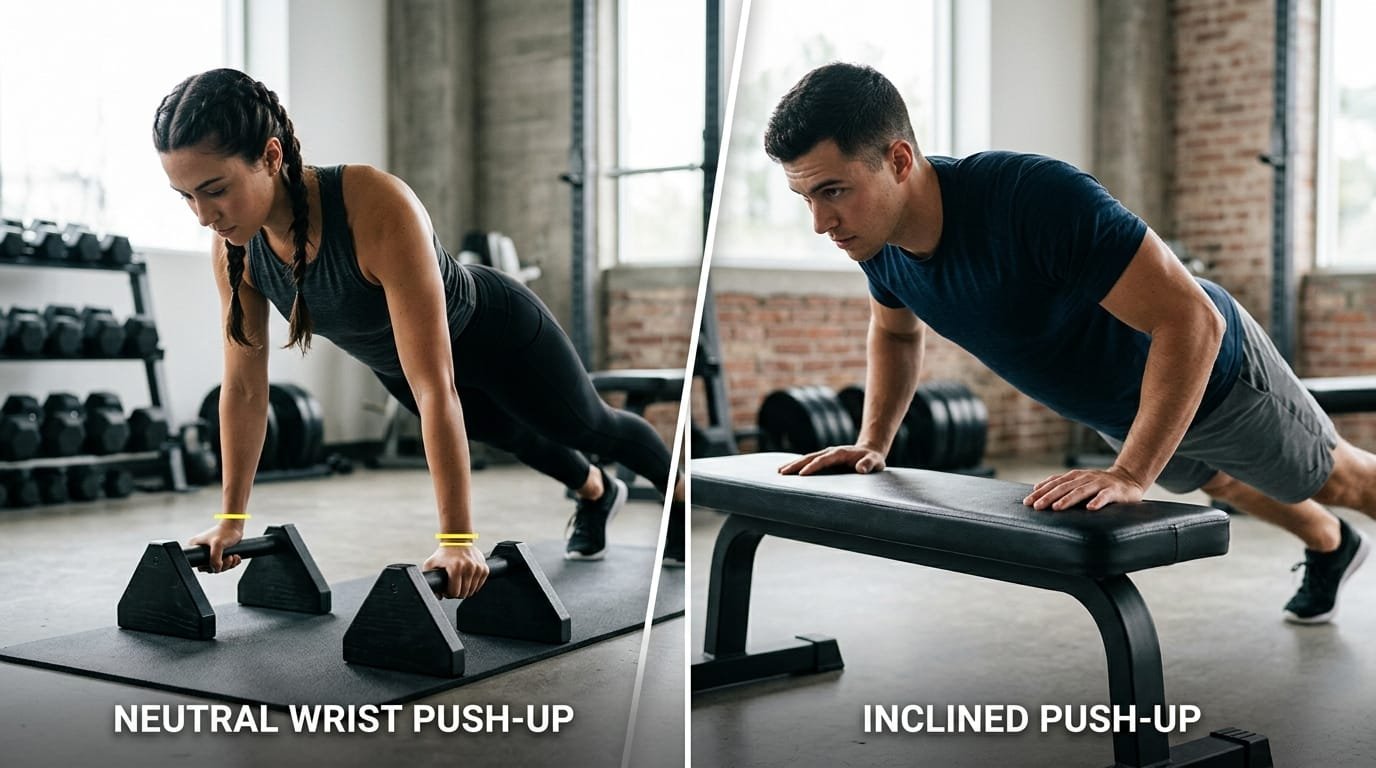
- Push-up handles or parallettes
- Hex dumbbells
- Knuckle push-ups on a padded surface
- Hands elevated on a bar, box, or edge so the wrists stay more neutral
- Slight outward turn of the hands combined with full-hand gripping of the floor
These options allow continued training while wrist capacity improves through mobility and strengthening work, including grip training (Do Hand Grippers Really Work?).
Progression Ladder That Minimises Joint Stress
Level 1 – Elevated or Incline Push-Ups
Hands on a sturdy box, bench, or wall. Higher surfaces are easier. Focus on perfect form and full control.
Level 2 – Knee Push-Ups with Strict Form
Maintain the same rigid plank from knees to head. Avoid letting the hips sag or the lower back arch.
Level 3 – Full (Toe) Push-Ups with Limited Range
Perform only the portion of the range that remains completely comfortable. Gradually increase depth as control improves.
Level 4 – Full-Range Push-Ups with Tempo and Pauses
Add 3-second eccentrics, pauses just above the floor, or pauses at the top with active protraction.
Level 5 – Leverage and Density Progressions
- Feet-elevated (decline) push-ups
- Archer or typewriter push-ups
- Reduced base of support (closer hands or one-foot variations)
- Higher density (more quality reps in less time)
Level 6 – External Load (Only After Mastery)
Weighted vest or plate on the back, used conservatively once bodyweight versions are solid and pain-free.
Advance only when the current level feels controlled and symptom-free for multiple sessions.
Comparison of Progression Methods
| Method | Joint Stress | Strength Stimulus | Best Used When |
|---|---|---|---|
| Elevate hands | Low | Moderate | Early stage or during irritation |
| Knee push-ups | Low–Moderate | Moderate | Building core and scapular control |
| Limited range of motion | Low | Moderate | Returning from discomfort |
| Slow tempo / pauses | Low–Moderate | High | Technique refinement and control |
| Feet elevated | Moderate–High | High | Once form is excellent |
| External load | Higher | High | Advanced, fully prepared trainees |
Step-by-Step Weekly Progression Framework
- Film a set every week to verify elbow angle, body line, and scapular behaviour.
- Choose the hardest variation you can perform for 3 sets of 6–10 clean repetitions with zero joint pain.
- Add 1–2 repetitions per set each session, or slow the tempo, while form stays perfect.
- When you can complete the top of the target range easily, move to the next harder variation and drop the repetitions back to the lower end.
- Insert a lighter technique day or active recovery if any residual wrist or shoulder stiffness appears.
- Continue supporting the pattern with scapular push-ups, band pull-aparts, and external-rotation work.
- Reassess every 2–3 weeks and adjust the ladder position as needed.
- Prioritise consistency over aggressive jumps in difficulty.
- Keep total weekly push-up volume reasonable relative to recovery and other pressing work.
- Maintain grip and forearm strength so the wrists have better muscular support.
Supporting Work That Accelerates Safe Progress
- Scapular push-ups and serratus punches for protraction control
- Band pull-aparts and face pulls for posterior shoulder balance
- Light external rotations for cuff readiness
- Wrist mobility drills and controlled load-bearing practice
- Core bracing drills so the plank position stays rigid under fatigue
These elements reduce the compensatory stress that often leads to irritation when volume or difficulty increases.
Programming Guidelines
- Frequency: 2–4 push-up sessions per week depending on overall upper-body load.
- Volume: Begin with manageable sets and err on the side of leaving 1–3 repetitions in reserve.
- Placement: After a thorough warm-up that includes rotator-cuff and scapular activation.
- Deloads: Every 4–6 weeks reduce volume or intensity for a session or week.
Strength training performed with progressive yet joint-friendly overload remains one of the most effective ways to build upper-body strength and resilience (strength training guidance). Practical home-gym approaches emphasise mastery of fundamentals before advanced variations (home gym equipment prioritisation and budget home gym principles).
Common Progression Mistakes That Cause Irritation
| Mistake | Result | Better Approach |
|---|---|---|
| Jumping to full push-ups too soon | Wrist or shoulder overload | Stay on elevated or knee versions longer |
| Adding volume before technique is solid | Form breakdown under fatigue | Lock in clean reps first |
| Ignoring early warning discomfort | Escalation of irritation | Regress immediately at the first sign of joint pain |
| Neglecting scapular and cuff work | Unstable pressing platform | Include activation drills in every session |
| Using fast, uncontrolled tempo | Increased joint stress | Emphasise controlled eccentrics |
| Progressing multiple variables at once | Excessive total stress | Change only one variable at a time |
A frequent source of setbacks is the tendency to measure progress only by the most advanced variation achieved rather than by the quality and consistency of the work being performed. Moving from elevated push-ups to full toe push-ups is a clear milestone, yet the real gains in joint resilience and pressing strength often occur while still working at the earlier levels—provided every repetition is performed with strict elbow tracking, solid scapular control, and a rigid plank. Treating each stage as valuable training rather than a temporary inconvenience keeps the focus on tissue adaptation and motor learning, both of which are essential for long-term, irritation-free progress.
Another practical accelerator is the deliberate use of “filler” sets of scapular and cuff activation between working sets of push-ups. After finishing a set of elevated or full push-ups, a short set of band pull-aparts or light external rotations can reinforce the exact stabilising patterns needed for the next set while promoting blood flow without adding meaningful fatigue. Over the course of a session this mini-circuit approach improves the quality of every pressing repetition and reduces the gradual drift into compensatory positions that commonly appears as fatigue accumulates.
Finally, recovery between sessions deserves the same attention as the progression ladder itself. Wrists and shoulders that feel mildly irritated often respond better to an extra day of rest or a complete switch to neutral-wrist and scapular-focused work than to another attempt at the same variation. Tracking not only the sets and reps completed but also how the joints feel the following morning provides clearer guidance than any fixed schedule. When progression decisions are made on the basis of both performance and recovery, the risk of repeated irritation drops sharply and steady advancement becomes far more reliable.
Frequently Asked Questions
How long should I stay on elevated or knee push-ups?
As long as needed to perform multiple sets with perfect form and zero joint discomfort. There is no prize for rushing.
Can I progress if my wrists still feel mildly stiff?
Use neutral-wrist setups and continue mobility work. Mild stiffness that warms up may be tolerable; sharp or worsening pain is not.
Are diamond or close-grip push-ups safe for progression?
They increase triceps demand but can stress wrists and shoulders more. Introduce them only after standard push-ups are solid and comfortable.
How do I know when I’m ready for feet-elevated push-ups?
When you can perform full-range, controlled toe push-ups for the target sets and reps with excellent form and no residual joint irritation.
Should I train push-ups every day to progress faster?
Most people progress better with 2–4 quality sessions per week and adequate recovery, especially if wrists or shoulders have been sensitive.
What if one shoulder feels worse than the other?
Check for asymmetries in scapular control or core bracing. Single-arm supported variations and unilateral scapular work can help even things out.
Is a weighted vest a good progression tool?
Yes once bodyweight versions are mastered and completely pain-free. Start very light and monitor joint response closely.
How important is filming my sets?
Extremely helpful. Many form breakdowns that lead to irritation are invisible without video feedback.
Final Recommendation
Progressing push-ups without aggravating the wrists or shoulders is a process of earning each harder variation through consistent, high-quality practice rather than forcing the next level. Lock in elbow position, plank rigidity, scapular control, and wrist-friendly setups first. Then advance through elevation, range of motion, tempo, leverage, and finally external load—only while every repetition remains comfortable.
Support the main work with scapular activation, rotator-cuff preparation, and grip strength. Film regularly, change only one variable at a time, and regress at the first sign of joint irritation.
This methodical approach builds real pushing strength while keeping the wrists and shoulders healthy for the long term. Begin at the appropriate level on the progression ladder today, prioritise clean repetitions, and let sustainable overload do the rest. Clean, pain-free push-ups are far more valuable than rushed, irritating ones.