
Common Push-Up Mistakes That Cause Wrist and Shoulder Pain (and How to Fix Them)
Quick Answer
The most common push-up mistakes that cause wrist and shoulder pain are flared elbows (creating a T-shape), hands placed too far forward or too wide, locked or poorly controlled shoulder blades, collapsed core/sagging hips, and forced wrist hyperextension on a flat surface. Fix them by tucking elbows to roughly 30–45 degrees from the torso, placing hands slightly wider than shoulder-width and under the shoulders, actively protracting the scapulae at the top, bracing the core and glutes into a rigid plank, and using neutral-wrist options (handles, parallettes, knuckles, or elevated palms) when wrists are sensitive. These corrections redistribute load away from irritated tissues and onto the intended muscles, allowing pain-free progressive training.
Why Push-Ups Commonly Irritate Wrists and Shoulders
Push-ups look simple but demand simultaneous strength, mobility, and coordination across the wrists, elbows, shoulders, scapulae, and core. When any link is weak or poorly positioned, force transfers to passive structures—ligaments, joint capsules, tendons, and the subacromial space—instead of muscle. Over repeated repetitions this creates inflammation, impingement, or overuse pain.
Wrist pain usually stems from sustained end-range extension under bodyweight. Shoulder pain most often arises from positions that narrow the subacromial space or overload the anterior joint structures. Both are highly correctable with technique changes and simple regressions.
Mistake 1: Elbows Flared to 90 Degrees (The “T” Position)
Why it causes shoulder pain
When elbows point straight out to the sides, the upper arms form a T with the torso. This forces the humeral head forward and upward under load, reducing the subacromial space and pinching rotator-cuff tendons and bursa against the acromion. It also increases internal rotation stress on the shoulder joint.
How to fix it
Tuck the elbows so they sit roughly 30–45 degrees from the sides of the torso—creating an arrow shape rather than a T when viewed from above. This opens the subacromial space, better shares load between chest, shoulders, and triceps, and keeps the joint more centered.
Practical cue
“Point your elbows toward your feet, not the walls.”
Mistake 2: Hands Too Far Forward or Excessively Wide
Why it causes shoulder pain
Hands placed well in front of the shoulders push the humeral head forward in the socket. Excessively wide hand placement increases the rotational demand on the shoulder and can further narrow joint space.
How to fix it
Set the hands roughly shoulder-width or slightly wider, with the wrists stacked directly under or just below the shoulders at the top of the movement. Fingers should point forward or turn out 10–20 degrees for comfort.
Practical cue
“Stack wrists under shoulders, then screw the hands into the floor as if trying to spread the ground apart.” This external-rotation tension stabilizes the joint.
Mistake 3: Poor Scapular Control (Locked or Winging Blades)
Why it causes shoulder pain
If the shoulder blades stay fixed or wing off the ribcage, the glenohumeral joint absorbs forces it is not designed to handle alone. Lack of protraction at the top and controlled retraction/depression on the way down leaves the rotator cuff and surrounding tissues overloaded.
How to fix it
At the top of each repetition, actively push the floor away so the shoulder blades spread apart (protraction). On the way down, allow controlled movement while keeping the blades from winging. Practice isolated scapular push-ups (arms straight, only the blades move) to build this skill.
Practical cue
“Push the floor away at the top; don’t just lock the elbows.”
Mistake 4: Collapsed Core and Sagging Hips
Why it causes shoulder (and sometimes lower-back) pain
When the hips sag or the lower back arches, the entire kinetic chain shifts. The shoulders end up in a less stable position and take extra load. The head often pokes forward as a compensation, further stressing the cervical and shoulder region.
How to fix it
Brace the abdominals and squeeze the glutes so the body forms a rigid plank from head to heels. Maintain this tension throughout the entire set. If you cannot hold the plank, regress to an elevated or knee version until the core can keep pace with the upper body.
Practical cue
“Squeeze glutes and brace abs as if someone is about to punch your stomach.”
Mistake 5: Forced Wrist Hyperextension
Why it causes wrist pain
A standard flat-palm push-up places the wrist near 90 degrees of extension while supporting a large percentage of bodyweight. Limited mobility, weak forearm stabilizers, or simply high volume on a hard surface overload the small bones, ligaments, and tendons of the wrist.
How to fix it
Create a more neutral wrist angle:
- Use push-up handles, parallettes, or hex dumbbells
- Perform knuckle push-ups on a padded surface
- Place the heels of the hands on a rolled towel or mat edge so the fingers drop slightly
- Turn the hands slightly outward and spread the fingers to distribute pressure
Build wrist capacity separately with controlled articular rotations (CARs), gentle extensions, and forearm strengthening.
Practical cue
“Grip the floor with the whole hand—don’t dump all the weight into the heel of the palm.”
Comparison Table: Mistakes, Consequences, and Fixes
| Mistake | Primary Pain Location | Immediate Fix | Long-Term Solution |
|---|---|---|---|
| Elbows flared 90° | Front/top of shoulder | Tuck to 30–45° | Practice arrow-shaped arm path |
| Hands too far forward/wide | Anterior shoulder | Stack under shoulders | Film sets and adjust placement |
| Locked or winging scapulae | Shoulder joint / impingement | Protract at top | Scapular push-ups & serratus work |
| Sagging hips / weak core | Shoulder + low back | Rigid plank brace | Plank variations & glute activation |
| Wrist hyperextension | Wrist / forearm | Neutral-wrist tools or elevation | Mobility drills + gradual loading |
Step-by-Step Correct Push-Up Setup
- Start in a high plank on a non-slip surface.
- Place hands slightly wider than shoulder-width, wrists stacked under shoulders.
- Spread fingers and lightly “screw” the hands into the floor for external rotation.
- Brace abs and squeeze glutes so the body forms one straight line.
- Set the shoulder blades in a neutral, slightly protracted position.
- Lower under control with elbows tracking at ~45 degrees.
- Descend until the chest is near the floor (or as far as form allows).
- Push the floor away, fully protracting the scapulae at the top.
- Maintain core tension for the entire set.
- Breathe steadily—exhale on the way up.
Film yourself from the side and from above to verify elbow angle and body line.
Regressions and Alternatives When Pain Persists
- Elevated push-ups (hands on a bench or box) to reduce load
- Knee push-ups with the same strict form cues
- Wall push-ups for very early stage or high irritability
- Neutral-wrist variations with handles or dumbbells
- Scapular-focused drills and band pull-aparts before loading
These options keep the pattern alive while tissues calm down. Once pain-free range is restored, gradually increase the difficulty.
Building Resilient Wrists and Shoulders
Wrist capacity work
- Wrist CARs in all directions
- Gentle loaded extensions and flexions
- Farmer carries and grip work to strengthen supporting muscles (Do Hand Grippers Really Work?)
Shoulder and scapular resilience
- Serratus anterior activation (scapular push-ups, band punches)
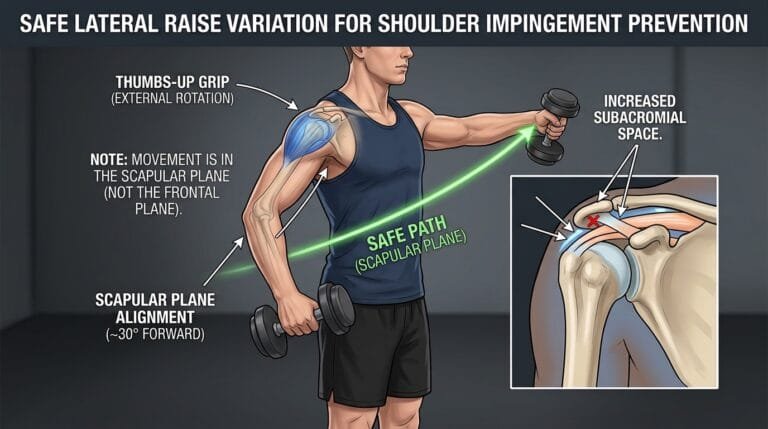
- Controlled lateral-raise variations that emphasize joint-friendly angles and scapular control (Bent Arms vs. Straight Arms in Lateral Raises, The Hidden Mistake in Lateral Raises, and 3 Lateral Raise Modifications)
- Face pulls or band pull-aparts for posterior shoulder balance
Consistent attention to these supporting qualities makes the push-up itself far more forgiving.
Programming Considerations for Pain-Free Progress
- Prioritise quality over quantity—stop sets before form breaks.
- Use a controlled tempo (e.g., 3 seconds down, 1 second up).
- Allow adequate recovery between high-volume push-up sessions.
- Progress one variable at a time (range, elevation, repetitions, then load).
- Include scapular and rotator-cuff work in warm-ups.
Strength training performed with good mechanics remains one of the best ways to build resilient upper-body tissue (strength training guidance). Practical home-gym approaches emphasise technique and progressive loading over chasing high-rep maxes too soon (home gym equipment prioritisation and budget home gym principles).
Frequently Asked Questions
Why do my wrists hurt even when my form looks good?
Limited wrist extension mobility or insufficient forearm strength is the usual reason. Neutral-wrist tools and dedicated mobility work almost always resolve it.
Is it okay to keep training if I feel mild shoulder discomfort?
Mild muscle fatigue is normal; sharp, pinching, or lingering joint pain is not. Reduce range or regress until the discomfort disappears.
How long does it take for push-up pain to resolve with corrections?
Many people notice improvement within a few sessions of strict technique changes. Persistent issues may need 2–4 weeks of regressions plus supporting work.
Are knuckle push-ups safe for the wrists?
When performed on a padded surface with good alignment they place the wrist in a more neutral position and are often more comfortable than flat-palm versions.
Can I do push-ups every day?
High-frequency push-ups without recovery can irritate tendons. Most people progress better with 2–4 focused sessions per week plus supporting mobility work.
Do I need special equipment to fix these problems?
No. Most corrections are technique-based. Handles or parallettes are helpful for wrists but not mandatory.
Should I stretch my chest if my shoulders hurt during push-ups?
Gentle thoracic and pec mobility can help, but the primary fixes are elbow position, scapular control, and core bracing.
When should I see a professional?
If pain is sharp, radiates, causes weakness, or does not improve after 1–2 weeks of corrected form and reduced volume, consult a qualified clinician.
Final Recommendation
Wrist and shoulder pain during push-ups is almost always the result of correctable position and control errors rather than the exercise itself being inherently harmful. Tuck the elbows, stack the hands, control the scapulae, brace the core, and give the wrists a more neutral angle when needed. These adjustments redistribute force onto muscle and away from irritated tissues.
Master the rigid plank and arrow-shaped arm path, use regressions until the pattern feels solid, and support the movement with scapular and grip work. Once technique is reliable, progressive overload becomes safe and productive.
Film a set today, apply the cues above, and rebuild the push-up from a pain-free foundation. Consistent, well-executed push-ups remain one of the highest-value bodyweight exercises available—fix the common mistakes and they will serve you for years.