How to Progress from Knee Push-Ups to Full Push-Ups Without Injury
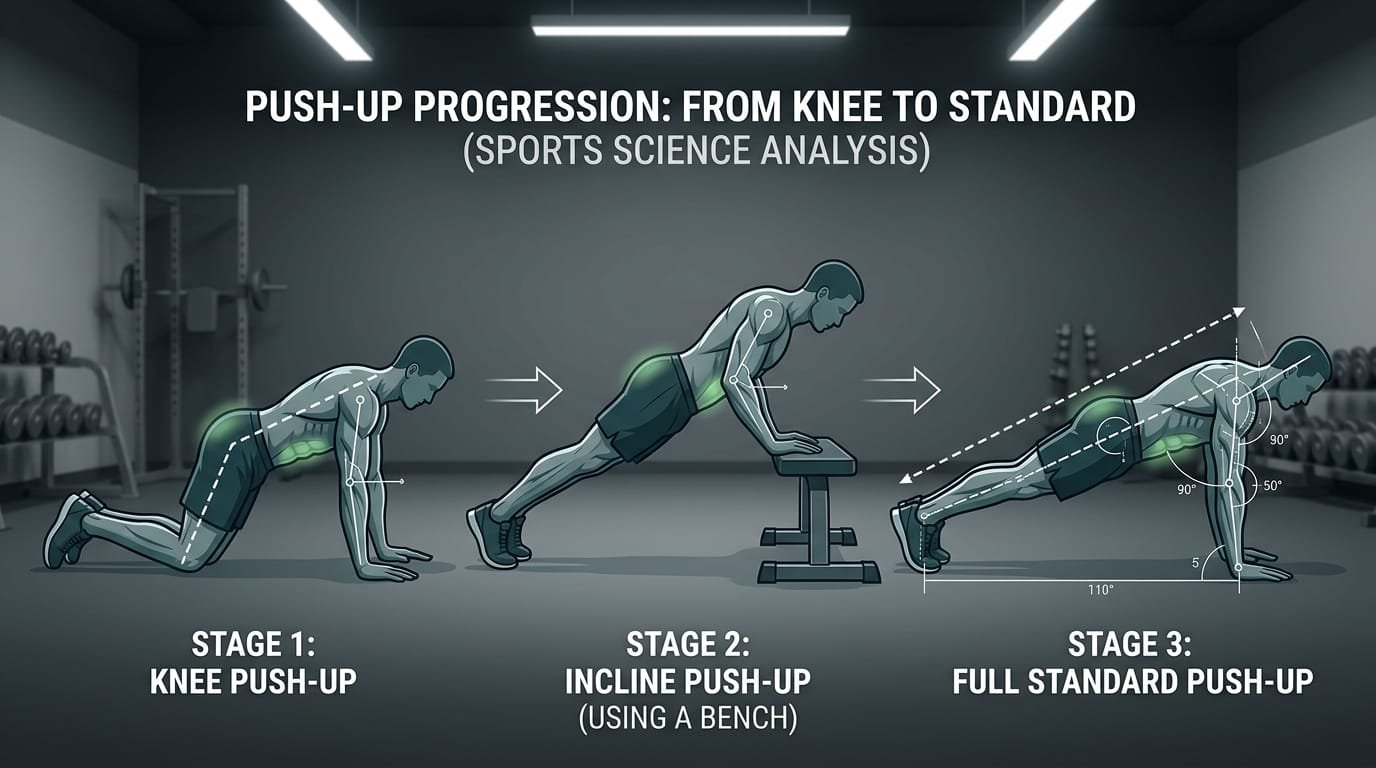
Quick Answer The safest and most effective way to progress from knee push-ups to full push-ups is a gradual, form-focused ladder: master high-quality knee push-ups → move to incline (hands-elevated) push-ups at progressively lower heights → add eccentric (negative) full push-ups → introduce hybrid sets (full push-ups mixed with knee or incline) → finally perform full push-ups. Prioritise a rigid plank body line, controlled tempo, and pain-free range at every stage. Most people who stay consistent can make the transition in 4–12 weeks without injury when they respect the progression criteria.
Why Knee Push-Ups Alone Are Rarely Enough
Knee push-ups reduce the percentage of body weight supported by the upper body (typically around 50–60 % compared with 65–75 % in a full push-up) and significantly lower the demand on the core, glutes, and scapular stabilisers. While they are a useful early regression, remaining on them for too long often leaves the trunk under-prepared. When a lifter finally attempts full push-ups, the hips sag, the lumbar spine extends, the shoulders lose stability, and wrist or elbow stress rises—exactly the patterns that produce discomfort or long-term plateaus.
A superior approach keeps the full-body plank pattern intact while gradually increasing load. Incline push-ups achieve this by changing the body angle rather than removing the lower-body contribution. This method is widely recommended by coaches and physical therapists because it builds both the pressing strength and the core stability required for the full movement. Practical progression frameworks appear in resources such as those from Nerd Fitness and detailed coaching guides on push-up regressions.
The Complete, Evidence-Informed Progression Ladder
Level 1: High-Quality Knee Push-Ups Treat this stage as technique practice, not just an easy version.
- Body forms a straight line from knees to head (no sagging hips or piking).
- Hands slightly wider than shoulder-width, fingers spread for a stable base.
- Elbows track at approximately 45° to the torso.
- Full range of motion: chest nearly reaches the floor, arms fully extend at the top without aggressive lockout.
- Controlled tempo—especially a 2–3 second lowering phase.
Progression criterion: 3 sets of 12–15 clean, controlled repetitions with perfect form on two consecutive sessions.
Level 2: Incline Push-Ups (Hands Elevated) This is the most important bridge for most people.
- Begin with a high surface (kitchen counter, sturdy table, or Smith-machine bar set near chest height).
- Walk the feet back until the body forms a rigid straight line from head to heels.
- Perform the identical strict form used in a full push-up.
- As strength improves, systematically lower the surface (counter → bench → aerobic step → low box → floor).
Each reduction in height meaningfully increases the percentage of body weight you support while preserving the core demand. Detailed incline progression strategies are outlined in coaching resources such as those from BarBend and NASM.
Progression criterion: 3 sets of 10–12 clean repetitions at the current height before dropping to the next lower surface.
Level 3: Eccentric (Negative) Full Push-Ups
- Start in the top of a full push-up position on the toes.
- Lower under full control for 3–5 seconds until the chest is near the floor, maintaining perfect body alignment.
- Drop the knees to the floor to reset, or perform a knee push-up to return to the starting position.
- This builds strength precisely in the range where most people are weakest (the bottom half of the movement).
Level 4: Hybrid Sets
- Perform as many full push-ups as possible with impeccable form (even if only 1–3).
- Immediately continue the set with knee or incline push-ups until the target total volume is reached.
- Session by session, increase the number of full repetitions and decrease the modified ones.
Level 5: Full Push-Ups
- Maintain the rigid plank, complete range of motion, and controlled tempo.
- Build volume systematically (for example, 3 × 5 → 3 × 8 → 3 × 10).
- Only add more advanced variations (decline, weighted, or tempo work) after you can perform multiple clean sets of 10–12 full push-ups.
Detailed Step-by-Step Technique Checklist (Apply at Every Level)
- Place the hands slightly wider than shoulder-width with fingers spread and pressing evenly into the surface.
- Create a rigid plank: brace the core hard, squeeze the glutes, and keep the body in one straight line from head to heels (or knees).
- Lower under control until the chest is close to the surface or floor.
- Keep the elbows at roughly 45° relative to the torso—avoid flaring them out to 90°.
- Drive through the palms and fully extend the arms at the top without hyperextending the elbows.
- Maintain a neutral neck (eyes looking slightly ahead of the hands, not down or excessively up).
- Breathe rhythmically: inhale during the lowering phase, exhale during the pressing phase.
- Stop the set the moment form deteriorates.
Filming yourself from the side is one of the highest-value habits during this process.
Sample 6–10 Week Progression Plan
Weeks 1–2 (Foundation)
- Frequency: 3 sessions per week
- Knee push-ups: 3 sets of 10–15 with 2–3 second lowering
- Accessory: 3 × 20–40 second high planks or dead bugs
Weeks 3–4 (Incline Introduction)
- Incline push-ups at a high, comfortable height: 3 sets of 8–12
- Continue core work
- Optional: light scapular activation (band pull-aparts or face pulls)
Weeks 5–6 (Lower Incline + Eccentrics)
- Drop the incline height
- Begin each set with 3–5 slow eccentric full push-ups, then finish with incline or knee reps
Weeks 7–8 (Hybrid Transition)
- Hybrid sets: maximum clean full push-ups + remaining volume on knees or incline
- Goal: accumulate 3 sets of 5–8 full push-ups with solid form
Weeks 9–10 (Consolidation)
- Focus on full push-ups, adding a rep or set only when form remains perfect
- Maintain core and scapular work
Rest at least 48 hours between dedicated push-up sessions. Progress only when the current level feels controlled and repeatable.
Comparison of Common Approaches
| Method | Core & Glute Demand | Load Adjustability | Injury Risk if Rushed | Best Use Case |
|---|---|---|---|---|
| Knee push-ups only | Low | Limited | Medium–High | Very early regression only |
| Incline push-ups | High | Excellent | Low | Primary progression tool |
| Eccentric full push-ups | High | High (lowering) | Low when controlled | Strength bridge |
| Hybrid sets | High | Progressive | Low | Final transition phase |
| Jumping straight to full | High | None | High | Avoid |
| Wall push-ups | Low–Moderate | High | Very Low | Absolute beginners or wrist issues |
Injury-Prevention Principles
- Never trade the rigid plank line for extra repetitions.
- Stop a set the instant hips sag, elbows flare excessively, range shortens, or shoulders feel unstable.
- Address wrist comfort early—use parallettes, hex dumbbells, or fists if flat-palm positions cause irritation.
- Strengthen the scapular stabilisers and rotator cuff so the shoulders remain centred under load.
- Build dedicated core endurance (planks, dead bugs, hollow holds) alongside the push-up work.
- Progress only one variable at a time: surface height, range of motion, or total volume—not all three simultaneously.
- Allow adequate recovery; tissue adaptation requires rest as much as stimulus.
Integrating Push-Up Progress with the Rest of Your Training
Push-up strength transfers directly to pressing movements performed with adjustable dumbbells and kettlebell floor presses or bottoms-up variations. Strong grip endurance helps maintain consistent hand pressure and external-rotation torque throughout the set. Core control developed through ab roller variations or hanging leg raises directly supports the rigid plank required for full push-ups.
Recovery tools such as a budget massage gun can help manage residual chest, shoulder, triceps, and forearm tension. Light cardio on a manual treadmill or mobility flows with resistance bands aid recovery between sessions. Continue to apply the principles from your lateral raise form guide so isolation work does not reinforce poor scapular patterns that appear under fatigue during push-ups.
Common Mistakes That Cause Plateaus or Injury
- Remaining on knee push-ups for months because they feel comfortable
- Dropping the incline height too aggressively
- Allowing the hips to sag or the lower back to arch
- Flaring the elbows out to 90°
- Shortening the range of motion to chase higher numbers
- Training through wrist, elbow, or shoulder pain
- Neglecting core and scapular stability work
- Adding volume and difficulty at the same time
Frequently Asked Questions
How long does the average person take to go from solid knee push-ups to full push-ups? Most consistent trainees need 4–12 weeks. The exact timeline depends on starting strength, training frequency (ideally 2–4 sessions per week), sleep, nutrition, and how strictly form is maintained. Resources such as Nerd Fitness and coaching progressions emphasise consistency over speed.
Are incline push-ups really better than knee push-ups for progression? Yes for the majority of people. Incline variations preserve the full-body plank pattern and allow precise, measurable increases in difficulty by simply lowering the surface. This is why many physical therapists and strength coaches prefer them as the primary bridge.
What should I do if my wrists hurt during push-ups? Use parallettes, hex dumbbells, or perform the movement on closed fists to keep the wrists closer to neutral. Simultaneously work on wrist mobility and gradual loading tolerance. Persistent pain warrants professional assessment.
Can I practise push-up variations every day? Two to four focused sessions per week with at least one full rest day between is optimal for most beginners. Daily low-volume technique practice is possible only if intensity remains very low and recovery is excellent.
How do I know I am truly ready for the next level? You can complete the target sets and repetitions at the current level with perfect form on two consecutive sessions, and the movement feels controlled rather than maximal.
Should I add weight or decline variations once I can do full push-ups? Only after you can comfortably perform multiple sets of 10–12 clean full push-ups. Premature loading or elevation of the feet often reintroduces form breakdown.
Final Recommendation
Progressing from knee push-ups to full push-ups is both a strength and a skill process. Use incline push-ups as the primary bridge, incorporate slow eccentrics to build specific strength, then blend full and modified repetitions until complete sets on the floor become reliable. At every stage, protect the rigid plank body line, control the tempo, and refuse to sacrifice form for extra repetitions.
Stay patient, film your sets regularly, and advance only when the current level feels solid. When the movement pattern is clean and the load is increased gradually, the transition occurs smoothly and without injury. Master each stage, keep the core and scapulae engaged, and the full push-up will become a dependable, pain-free foundation for all future pressing work.
Consistency and respect for the progression criteria produce better long-term results than rushing. Follow the ladder, prioritise quality, and you will earn strong, resilient push-ups that serve you for years.